I always knew I wanted to be a teacher & being a parent gave me the platform to be the most influential teacher to the most important students in my life. So, how does a former teacher turn mom keep the teacher spark alive? She creates, makes messes, survives a daily grind & tries to sneak in educational moments for the little ones. Sometimes it works & sometimes it doesn't, but just adding hugs & kisses makes everything better.
Friday, March 10, 2017
Snow Day Fun- The Inside Edition
I absolutely love snow days, who doesn't?? With two cuties who are so excited for the white fluffy stuff it's hard not to be excited. My daughter is a little stuffy, so I decided to bring the outdoors inside and let them play with the snow at the kitchen table!!
My husband grabbed a large bucket and filled it with snow. We laid a towel out on our table and let their imaginations run wild. They had fun grabbing the snow and tasting it, and of course yelled "let's make a snowman!! So a little snowman was made, they formed eyes and mouth and a nose from snow (forgot to take that picture) and the giggles were endless. We talked about where snow comes from, why it's cold, and what happens when the snow is inside for too long- Mom win, I got some learning in!!
While the kids were playing I decided it would be fun to make "Snow cream"- Snow Ice Cream!! We added some food coloring, m&m's and the kids had a blast!! They enjoyed eating a few bites and then wanted to play some more with the snow. If you're looking for a fun snowy activity, make some snow cream for yourself with my recipe below! I think I would like to try one with sweetened condensed milk for next time.... now to search for a recipe and let our hands thaw! Time for hot cocoa :)
Snow Ice Cream:
*8 cups of snow (more or less depending on how dense the snow is)
*1/3 cup sugar
*1 tsp vanilla extracts (can always adjust to your liking, or play around with other extracts)
*pinch of salt
*a few splashes of milk (any kind)
*Optional- food coloring, sprinkles, m&m's, chocolate chips, etc
Mix together all ingredients and add any toppings you like... get as creative as you want!
Thursday, March 2, 2017
Homemade play dough overload!!
It's play dough time again!! Over the winter break I made my kids some homemade play dough. Am I the only one who second guesses play dough the minute those fun little tools come out and play dough starts flying everywhere?? I can't beat the hours of fun the kids have, so I make it every now and then to let them enjoy it- plus it's great for fine & gross motor skills!
Yesterday, my friend and I made another batch of play dough for our little ones class. The big kids got jealous, so of course we had to make some for their class as well. Each month this year we have made scented play dough for the Tommy's class. We have experimented with pumpkin pie, cinnamon, peppermint, lavender, orange, cocoa and more... In January, we started adding glitter! The colors were black and white, so we figured if we added glitter to the white it would resemble snow... well, once we start with glitter, we don't want to stop, so the black had glitter too!
March's color is green, so we did Vanilla scented sparkly green... lucky little leprechauns! And since Gianna wanted some for her class I let her pick the colors- blue play dough with purple sparkles! This girl and her love of sparkles.. I wonder where she gets it from?
Want to make your own play dough? Here's our recipe.. it works great! Store it in an air tight container for up to a month!
1 cup flour
1 cup water
1/2 cup salt
1 tbs oil
1 tbs cream of tartar
*optional - food coloring, extracts, spices, scented oils, and glitter!
Combine all ingredients (minus any glitter) and mix well. Stir over a medium heat until it forms a ball. Knead for a minute or so and form into a ball and store it in an airtight container. You can let it cool for about a half hour in an opened container.
Wednesday, March 1, 2017
Welcome to our new home...
Welcome to our new home!! I have finally moved over all of my old posts, I forgot how many I have written!! I had such a great walk down memory lane while reformatting each post. I laughed, I cried, and most of all, I saw how much fun we have had over the last few years!! I decided to make it official and buy the domain, I absolutely love it!! Just Add Hugs & Kisses will live on forever and ever at this location!!
Valentines... love (and candy) are in the air!
Valentine's has come and gone and I'm so thankful for the fun we had this year creating special treats for our friends! We made the teachers Candy Heart Wreaths , the kids helped to pick out the candy and I placed them with my handy hot glue gun- my favorite thing!!!! I added a ribbon to make a hook to hang and curly ribbon to enhance the wreath!!
I also made candy roses for the teachers, one of my favorite gifts. Last year I made them as part of the party centerpieces for Gianna's Valentine's Party. When I taught 4th grade, this was my absolute favorite project to do!! I made a quick unit about roses- we smelled them, heard songs & poems about them, made up our own poems (and a few songs), pressed the leaves, and learned the different parts of a flower. We then made our own candy roses to give to parents/guardians on Valentine's Day. It was so special for the children to be proud of their hard work, it truly melted my heart!! I still love these roses and have enjoyed making them the last two years for my children's teachers and their friends.
This year my two valentine's asked for a "cool and different" valentine for their friends, so we got on my favorite app- PINTEREST and began our search. We quickly discovered our love of the valentine's robot, but I knew it had to be a healthy one, not one full of sugar- because let's face it, they get too much candy and want to eat it all!! I decided to mix together a few versions I saw and added a few of my own creative touches to create the adorable "Love Bots" pictured above.
I needed to make some special treats for my own valentines, so I got busy in the kitchen... with my two little helpers of course! We made gourmet chocolate covered strawberries (some had coconut, some had sprinkles, fancy right??), heart cookies and my famous chocolate covered pretzels. I even had a request for my pretzels as a gift for their hubby, so I wrapped them up nicely, added some chocolates and viola- instant Valentine's Gift!!
I'm one very lucky mommy and I'm thankful each day for all the love we have in our home. Daddy was super happy with the yummy treats, but he most definitely enjoyed the sauteed shrimp and heart ravioli's!! Sending lots of love to all, Happy Valentine's Day!!
Santa Sleighs, Christmas Cupcakes & Fruit Ornament, OH MY!!
Today both of my cuties had their Christmas party. I was a busy elf creating and baking for these parties, which was a welcomed distraction after the passing of my grandmother a few weeks ago. I channeled her love of feeding others and became a baking and prepping elf! I made each child a Santa Sleigh made with a variety of candy, and lots of hot glue (make sure your temp isn't too high!). I topped each one with a bow and tag saying "Merry Christmas".
I then got to baking and baking and baking some more... I made Santa cupcakes and "Christmas Light" ornaments for Gianna's class party, since I signed up for a sweet treat. Check them out below, we have an amazing group of talented mama's for Gianna's class, so our table was filled with adorable and tasty Christmas treats.
For Tommy's class I signed up for a healthy treat and my little fruit fly LOVES to eat any and all fruit. Tommy was so excited and couldn't wait to eat the entire ornament. I added star fruit as a fun shape and make it a little more special. Did you know star fruit really doesn't taste like anything? Maybe we have had bad ones, but the ones we tried a few months ago were very bland- WHO KNEW???
Wishing you all a very happy & healthy holiday season... hug your loved ones a little longer this year!
Glitter Ornaments
The kids have their Christmas parties this week and you have to see what I made for all of the teachers and students. How adorable are these personalized Glitter Ornaments??? Super easy and look stunning on any tree or even hung from a chandelier.
After making a bunch for the school, I knew I had to spoil our friends and family and got really creative. Below are the pictures of the family ornaments we made, using Gianna & Tommy's fingerprints. I made some snowmen in a snowy scene, and some even on a beach, for my parents, because they spend their summer on the beach. I also had our playgroup make these for our Christmas party, the adults got really into it!! These are super easy to make and you can get creative and mix glitter colors and layer, the possibilities are endless... I'm already planning my next ones!! Scroll to the bottom for directions to make your own!!
How to make Glitter Ornaments:
I strongly suggest getting the plastic ornaments because they won't break, but glass would also work.
Remove the top and swirl some clear floor wax (I used Pledge Floor Care), you only need about a tbs, which you will reuse. Make sure to coat the entire inside of the ornament. I empty the excess into a plastic cup to use for the next one.
Using a funnel, add some fine glitter- FINE glitter in much better than others. Pat the ornament or shake it until the entire ornament is covered.
Add cap and get decorating...
I told you it was easy!!
After making a bunch for the school, I knew I had to spoil our friends and family and got really creative. Below are the pictures of the family ornaments we made, using Gianna & Tommy's fingerprints. I made some snowmen in a snowy scene, and some even on a beach, for my parents, because they spend their summer on the beach. I also had our playgroup make these for our Christmas party, the adults got really into it!! These are super easy to make and you can get creative and mix glitter colors and layer, the possibilities are endless... I'm already planning my next ones!! Scroll to the bottom for directions to make your own!!
How to make Glitter Ornaments:
I strongly suggest getting the plastic ornaments because they won't break, but glass would also work.
Remove the top and swirl some clear floor wax (I used Pledge Floor Care), you only need about a tbs, which you will reuse. Make sure to coat the entire inside of the ornament. I empty the excess into a plastic cup to use for the next one.
Using a funnel, add some fine glitter- FINE glitter in much better than others. Pat the ornament or shake it until the entire ornament is covered.
Add cap and get decorating...
I told you it was easy!!
Holiday season...lots of fun, family and food!!
We have been very busy over the last few weeks... I helped organize and run the preschool St. Nick Night- which turned out amazing!! Families from the preschool came for a night of caroling, the symbols of Christmas and a delicious pasta dinner with homemade desserts. Gianna had her dance recital, she shined bright!! We hosted a friends holiday get together and a playgroup party. We also hosted one for Tom's co-workers where I made this adorable garlic knot wreath. Super easy and feeds a lot of people. I added a few tomatoes and basil leaves to make it pop. Last year I made a garlic knot tree ( I filled the bottom with sauce, but never got a picture because it went so fast!)- both were big hits!!
I also made these delicious puff pastry trees- one had Nutella and one had Oreo Cookie Spread inside... super delicious and easy to make!! Defrost puff pastry, cut a large triangle, and spread with your choice of delicious spread, our favorites are Nutella and Oreo Cookie so we stuck with those. Click here for the Pastry Tree Recipe.
I'm off to sleep for now, but wait until you see the next post- great holiday gift in the making... goodnight!!
Tuesday, February 28, 2017
Thanksgiving 2016
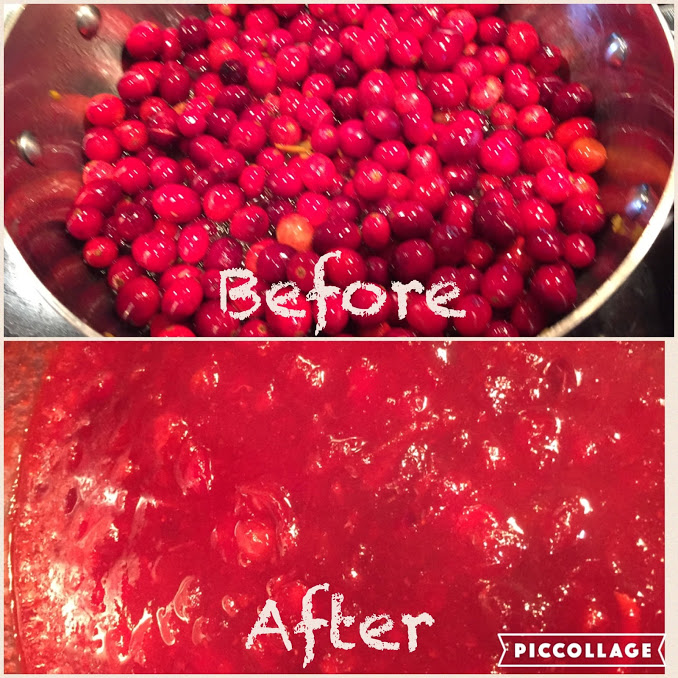
Cranberry Sauce:
*1 bag of cranberries
*1/2 cup of water
*1/2 cup sugar
*1/2 cup orange juice
*1 cup strawberry preserves
*cinnamon sticks
*orange zest
Combine all ingredients, except orange zest, and simmer until cooked to the consistency you prefer. When done, sprinkle orange zest over the top and serve warm or cool. ENJOY!!
Thanksgiving Class Party
I had to pop on and quickly share the adorable Turkey Centerpiece gifts we made for Gianna's class party. My friend and I had so much fun making these adorable turkeys, filled with m&m's, out of tulle and pipe cleaners and googly eyes!! I can't wait to see what everyone thinks, my kids sure love them!!
Gianna's 5th & Tommy's 3rd Birthday Party- Pajama Party
Pajama Party was in full effect for the kid's birthdays this year. Everyone dressed in their pajamas, some of us even went all out with slippers! I served breakfast food, such as stuffed bagel bites, muffins, fruit, and parfaits. I had milk, water and juice for the kids and hot cocoa, coffee and chai tea with a variety of creamers for the adults. We even brought our Keurig so everyone could make it their own way (big hit!!).
My kids LOVE donuts, so instead of a traditional cake, I had a local bakery make a donut tower and topped them with their birthday candle. I also had them make rice krispie treats, I would have made them myself, but unfortunately my great aunt passed away and I was busy with family matters. The donut tower and rice krispie treats were perfect for our large party, no one had to cut and serve!! Finally, the favors (which I somehow forgot to take a picture of) were pillow cases that I tie dyed, mini cereal boxes and Zak Sipper Cereal bowls (which I got for a $1 each at target, I bought out 3 stores). I wrapped each family together, each child received every item, then tied bows with ribbon and inserted decorated spoons on the top. They were absolutely adorable, still can't believe I didn't get a good picture!! The party was a hit and everyone is looking forward to next year already!! I better get thinking of a theme...
Subscribe to:
Posts (Atom)